Cake baking can be both a science and an art. It requires precise measurements, specific techniques, and a good deal of patience and creativity. Even experienced bakers can run into issues when baking cakes, whether it’s a dense texture, uneven baking, or frosting that just won’t stick.
In this blog post, we’ll go over seven of the most common cake baking mistakes and how to avoid them. Whether you’re a beginner or a seasoned baker, these tips will help you improve your cake baking skills and achieve delicious results. So, let’s get started and elevate your cake baking game!
Published: May 6, 2023 by Pamela
This post may contain affiliate links. Please read our disclosure policy.
Mistake 1: Over-mixing the Batter
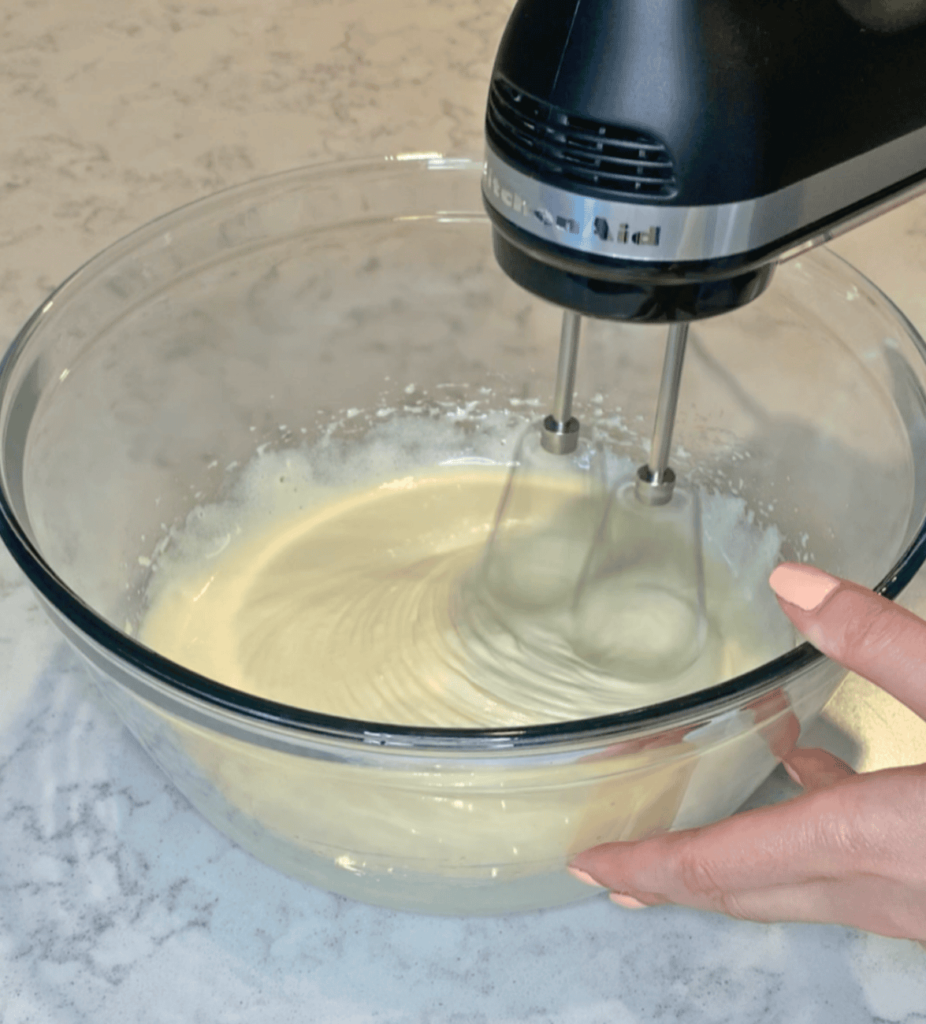
One of the most common mistakes that can happen during cake baking is overmixing the batter. Over-mixing can lead to gluten formation, resulting in a tough and dense cake. In this blog post, we’ll cover how to avoid overmixing and what it does to a cake.
What is overmixing, and why does it happen?
Over-mixing happens when the ingredients in the cake batter are beaten for too long or at too high of a speed. When you mix the batter too much, it creates too much gluten, which is a protein that forms when you mix flour and liquid. Gluten is what gives bread its structure and elasticity, but it’s not something you want in a cake. Overmixing the batter results in a dense, tough cake that lacks the softness and lightness that we all crave.
So, how can you avoid overmixing the batter?
- Sift the dry ingredients, such as flour and baking powder (cocoa powder if you are making a chocolate cake), and combine them together before incorporating them to the wet ingredients (cocoa powder if you are making a chocolate cake). This step ensures that the ingredients are well-combined and that there are no clumps. It also helps to aerate the flour, which can lead to a lighter cake texture.
- Make sure all the wet ingredients are well combined before you incorporate the dry ingredients. This will reduce the mixing process.
- When you combine the wet and dry ingredients, you want to mix them just enough to get a smooth batter, so make sure you stop mixing as soon as everything is combined. The best way to combine the wet and dry ingredients, while making sure not to over-mix, is to use a spatula or a whisk until there are no dry pockets left. If you’re using a stand mixer, set it to low speed. If you’re using a hand mixer, make sure to set it to the lowest setting and be patient while mixing. Mixing at a lower speed can help prevent the formation of gluten and keep the cake light and fluffy.
- Something I do with all my cake recipes is allowing the cake batter to rest. This can be as little as 10 minutes, but makes a huge difference to the cake texture. When you rest the batter, all the air bubbles will come to the surface which will allow the cake to rise evenly without having any holes when cut.
What to do if you’ve already over-mixed the batter?
If you’ve already overmixed the batter, don’t panic. Here are some ways to save it:
- Add a bit of liquid, such as milk or water, to the batter. This can help to break up the gluten and make the cake lighter.
- Fold in some whipped egg whites. Whipping egg whites to stiff peaks and folding them into the batter can help to lighten it up and make it fluffier.
- Use the batter as is and turn it into a different dessert, such as a cake roll. While the cake might not be as light and fluffy as you’d like, it can still be used in other delicious treats.
Mistake 2: Underbaking or overbaking the cake
What is underbaking or overbaking, and why does it happen?
Underbaking happens when the cake is not cooked all the way through, resulting in a raw and dense texture. Overbaking, on the other hand, happens when the cake is left in the oven for too long, resulting in a dry and burnt texture. Both mistakes can be caused by a few different factors, including incorrect oven temperature, inaccurate oven timer, or improper placement of the cake in the oven.
How to avoid under-baking or over-baking?
- Use an oven thermometer. To ensure that your oven is at the correct temperature, use an oven thermometer to check the temperature. Ovens can vary in temperature, so it’s essential to know what the actual temperature is to avoid underbaking or overbaking.
- Follow the recipe precisely. Although I always say that ovens are different and the baking time may vary from oven to oven and depending on the pan size, shape, material, etc. that you are using, stick to the same temperature mentioned on the recipe. Most of my cakes recipes are baked at 165C (329F), although this might be lower than most recipes you find on the web, I find this temperature to be best to allow the cake to bake slowly and evenly. A high temperature will make the cake rise fast and get a golden top, but it will still be raw and by the time it bakes, the golden top will become burned.
- Check for doneness. Check the cake’s doneness by inserting a toothpick or cake tester in the center of the cake. If it comes out clean, it’s done. If it’s still wet, bake for a few more minutes and check again. Repeat until the toothpick comes out clean.
- Use baking towels/strips. I can’t stress this enough, baking strips are absolutely a must for me. Baking strips help the cake bake more evenly, so no burnt edges, no raw middles, and no domes! Although not everyone would want to invest in baking strips (I didn’t), you can absolutely make your own at home using old towels. Don’t worry, they won’t burn in the oven as long as they are no touching the heat source (resistance or fire). I’ll write a blog post about the importance of baking strips and the different ways you can create your own at home.
So what can you do if you under-bake or over-bake a cake?
Here are some ways to save it:
- For an under-baked cake, put it back in the oven and bake for a few more minutes until it’s fully cooked.
- For an over-baked cake, you can use simple syrup or fruit juice to add moisture. I would advise not to cut the burnt edges and hide them with frosting, a burnt cake will definitely leave an aftertaste. Extremely important not to do that in case you sell your cakes! Another tip would be to transform your cake into cakepops or cakesicles.
Always remember to be patient, it takes time to understand and figure out the right temperature and time to bake the perfect cake.
Mistake 3: Not measuring ingredients properly
Measuring ingredients properly is one of the most important aspects of baking. It’s essential to measure ingredients correctly to ensure that the recipe turns out as intended.
Why is measuring ingredients correctly important?
Measuring ingredients correctly is essential because baking is a science. Unlike cooking, where you can add a pinch of this or a dash of that, baking requires precise measurements. Adding too much or too little of an ingredient can completely alter the recipe’s outcome, resulting in a cake that’s too dry, too dense, or doesn’t rise properly.
How to measure ingredients correctly?
Here are some tips to ensure that you’re measuring ingredients correctly:
- Use a kitchen scale. The most accurate way to measure ingredients is by weight, not volume. A kitchen scale is an essential tool for any baker. Weighing ingredients instead of measuring them with cups and spoons can ensure that you get the exact amount required in the recipe.
- Use measuring cups and spoons. If you don’t have a kitchen scale or prefer measuring with baking cups and spoons, be sure to use the right size cup or spoon specified in the recipe. Measuring cups and spoons are different from regular cups and spoons we use daily, they are very affordable, you can even find them at dollar stores so make sure you invest in a set of each.
- Fluff up dry ingredients. Before measuring dry ingredients like flour or sugar (specially brown sugar), use a fork or whisk to fluff them up. This will prevent clumping and ensure that you get an accurate measurement.
- Level off dry ingredients. When measuring dry ingredients, always level off the top with a knife or spatula. This ensures that you have the exact amount required in the recipe.
- Use liquid measuring cups for liquids. Liquid measuring cups are specifically designed for measuring liquids. Be sure to read the measurement at eye level and use a flat surface to ensure accuracy.
- Use different bowls. It is best not to put everything in the same bowl, try to prepare your ingredients ahead by separating them into different bowls. Although this might take a tiny bit of additional time, it will ensure to measure everything accurately and fix any mistakes in case you add too much of an ingredient.
Mistake 4: Using expired ingredients
Expired ingredients can be dangerous because they can contain harmful bacteria that can cause food poisoning. Over time, ingredients can also lose their potency, which can affect the outcome of your recipe. For example, using expired baking powder can result in a cake that doesn’t rise properly.
Here are some tips to avoid using expired ingredients:
- Check expiration dates. Before using any ingredient, check the expiration date. If it’s expired, discard it and use a fresh ingredient instead.
- Label ingredients. When you open a package of ingredients, be sure to label it with the date it was opened. This will help you keep track of when the ingredient was opened and when it expires.
- Store ingredients properly. Proper storage can help extend the shelf life of ingredients. Keep dry ingredients like flour, sugar, and baking powder in a cool, dry place. Store liquid ingredients like milk and eggs in the refrigerator.
- Use frozen ingredients within a reasonable time frame. Frozen ingredients like berries or butter can be used beyond their expiration dates if they have been stored properly. However, be sure to use them within a reasonable time frame to avoid any potential risks.
- Trust your senses.
Mistake 5: Not preheating the oven
Preheating your oven is crucial because it allows the oven to reach the right temperature before you start baking. When you put your baked goods in a cold oven, they won’t cook evenly, and the end result may not turn out as you intended. For example, if you’re baking a cake, it may end up being undercooked in the middle and overcooked on the outside. By preheating your oven, you ensure that the temperature is consistent and that your baked goods cook evenly.
Here are some tips to avoid not preheating your oven:
- Set a timer. If your oven does now indicate the temperature it has reached, set a timer for the recommended preheating time (if mentioned). This will help you remember to wait until the oven has reached the desired temperature before putting in your baked goods.
- Plan ahead. If you know you’ll be baking later in the day, set a reminder to preheat the oven ahead of time. This way, you won’t forget to preheat it when you’re ready to bake.
- Don’t rush. It’s important to take the time to properly preheat your oven, even if you’re in a hurry. Rushing the preheating process can result in an unevenly heated oven, which can affect the outcome of your baked goods.
- Use an oven thermometer. If you’re unsure if your oven is properly preheated, use an oven thermometer to check the temperature. This will help ensure that your oven is at the right temperature before you start baking.
Mistake 6: Opening the oven door too often
While it might seem like a minor thing, it can actually have a significant impact on the outcome of your baked goods. When you open the oven door, you let out a significant amount of heat. This can cause the temperature inside the oven to drop rapidly, which can affect the way your baked goods cook. Specifically, it can result in:
- Uneven baking: When you open the oven door too often, the temperature inside the oven drops, and it takes longer for your baked goods to cook. This can result in unevenly cooked treats, with some parts being overdone while others remain undercooked.
- Collapsed baked goods: Some baked goods, such as soufflés and cakes, rely on a consistent temperature to rise properly. When you open the oven door too often, the temperature changes can cause your baked goods to collapse.
Here are some tips to help you avoid the temptation to open the oven door too often:
- Use the oven light: Most ovens have a light inside that allows you to see what’s going on without opening the door. Use the light to check on your baked goods instead of opening the door.
- Use a timer: Set a timer for the recommended baking time and resist the urge to check on your baked goods until the timer goes off. This will help you avoid opening the door too often.
- Trust the recipe: Follow the recipe instructions carefully and resist the urge to open the oven door unless the recipe specifically calls for it.
- Know when to rotate: If your baked goods require rotating, do it quickly and efficiently without opening the door for too long.
Mistake 7: Frosting the cake too early
I know, you’re in a hurry, you’re tired, your friend’s birthday is in a few hours and you want to decorate the cake! But we don’t want melted frosting on a cake… When you frost a cake too early, the frosting can melt or slide off the cake. This is because the cake’s warmth and moisture can cause the frosting to soften, leading to a messy and unappealing final product. Additionally, frosting a cake too early can make it difficult to achieve a smooth and even frosting surface, as the cake may still be too warm and soft.
How to avoid frosting a cake too early?
Here are some tips to help you avoid frosting a cake too early:
- Let the cake cool completely: It’s important to let the cake cool completely before frosting it. This allows the cake to set and ensures that the frosting will stick properly. A good rule of thumb is to wait at least 2 hours before frosting a cake.
- Chill the cake: To make sure that the cake is cool enough to frost, you can chill it in the refrigerator. This will help the cake set and make it easier to work with. The best way would be to make the cake a day ahead and allow it to chill overnight.
- Use a crumb coat: A crumb coat is a thin layer of frosting that helps seal in the crumbs and create a smooth base for the final layer of frosting. By using a crumb coat, you can make sure that the final layer of frosting not only will stick properly to the cake but also have a super clean final layer.
- Consider the weather: If it’s a hot and humid day, you may need to wait longer for the cake to cool down before frosting it. The warmth and moisture in the air can make it difficult for the frosting to set properly.
- Allow your cake to come to room temperature. In cases of frozen cakes, remove the cake a few hours before decorating. You need to allow your cake to be completely unfrozen before decorating to avoid any excess water from being trapped under the frosting.
Cake baking can be a fun and rewarding activity, but it’s important to avoid common mistakes that can ruin your final product. By taking the time to measure ingredients properly, preheat your oven, avoid overmixing or overbaking, and pay attention to the timing of frosting and other steps, you can create delicious and beautiful cakes every time. With practice and attention to detail, you will become a skilled baker and wow your friends and family with your creations.

Leave a Reply