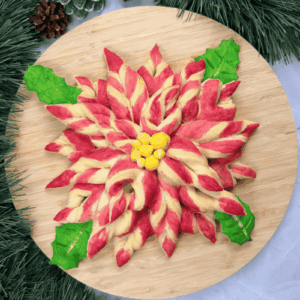
Christmas Poinsettia Bread
A beautiful Christmas poinsettia pull apart bread that’s an easy recipe, simple to shape, soft, and fun to color by painting the dough.
Ingredients
- 2 Cups Flour (I used all-purpose)
- 1 tsp Active dry yeast
- 1 Tbsp Granulated sugar
- 1 Egg
- ½ Cup Warm water (Or milk)
- Pinch Salt
- 15 g Unsalted butter
- Water food dyes to paint (Optional)
Instructions
To make the dough
- Place all the ingredients into your stand mixer except the butter.
- Mix on low speed until everything comes together. Should take about 3 minutes.
- Add the softened butter and mix again on low until it blends in completely.
- Increase the mixer speed to medium and knead the dough for 5 to 8 minutes.It should look smoother and feel soft and elastic.
- Cover the dough and let it rise for 1 to 2 hours, or until it doubles in size.
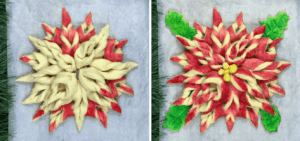
Shape the poinsettia
- Remove a small piece of dough and set it aside. You’ll use this part later to make the green leaves and the little yellow buds in the center of the poinsettia.
- Divide the remaining dough into 3 parts: 2 equal pieces and 1 smaller piece. Roll each into a circle.The largest circle will be the base layer.The second circle (same size) will be the second row of petals.The smallest circle will be the final row of petals.This gives you 3 layers total.
- Cut the first circle into 8 long slices, like cutting a pizza, but do not cut all the way through. The slices stay attached at the outer edge, but the center is cut.Cut a small line in the middle of each slice. Flip each triangle outward, then tuck the pointed tip into the small cut you made in the center of that slice. Lay each petal flat to form your first row of petals.

- For the second circle, repeat the same cuts, but this time cut all the way through like a real pizza, each piece should be separate.Make the small cut in the middle of each piece again, but this time cut all the way to the outer edge (not toward the center).To shape these petals, flip each side twice outward, bring the two sides together in the middle, flip the entire petal once, place it down between two base petals.

- For the last row, cut the smallest circle into 4 slices (like 4 “pizza cuts”). Repeat the shaping steps from the step above, and place each petal between the petals of the second row.
- Use the dough you set aside earlier to shape small green leaves and yellow buds for the center. To color the dough, use water-based food coloring and a brush. I used about 3 drops total, much less than if you were coloring the entire dough.
Rest, then bake
- Once everything is shaped and colored, let the poinsettia rest for 30 minutes.Bake at 200°C (392°F) for about 20 minutes in a preheated oven* Read Note before bakig!
Video
Notes
- * BEFORE BAKING! To keep the colors bright:
- Turn off the top element of your oven.
- Bake using only the fan and the bottom element, placing the bread on the middle rack.
- If your oven doesn’t allow turning off the top element while using the fan, place a baking tray on the top rack to block direct heat from above.
- Nutrition info is estimated and may vary based on ingredients and portions. For the most accurate details, consider using a nutrition tool or checking our full Nutrition Information Disclaimer.
- Nutritional value is calculated for the whole bread.
Nutrition
Serving: 1ServingCalories: 1118kcalCarbohydrates: 196.7gProtein: 31.8gFat: 20.1g
Tried this recipe?Let us know how it was!
