DIY Heart Shaped Cookies with Pink Marbled Icing
So, it's time to start planning for Valentine's Day and you want to make some cute cookies that are delicious but also really pretty, right? Well, these DIY heart-shaped cookies with pink marbled icing are the perfect choice. They are pretty easy to make, they look super pretty and sophisticated; and to make things easier, I will give you recipe options so you can make these cookies with ingredients you already have or are easily accessible to you 🩷
Here’s what you need:
A good sugar cookie recipe (I highly recommend trying mine - I’m might be biased, but it’s really good 😌)
Royal icing or royal glaze (I will list both my recipes below)
Heart shaped cookie cutter (whatever one you want)
Gel colors (whatever brand and colors you want)
Bowl
Trusting needle or simply a toothpick
Sugar Cookies Recipe
1 C. Unsalted butter, room temperature (225g)
1 C. Granulated sugar (200g)
1 Egg
A pinch of salt
1 tsp Vanilla extract
2.5 to 3 C. All-purpose flour (320g-385g)
For the Full Instructions please click here
If you prefer to watch a video to make the sugar cookies, here’s a tutorial:
Royal Icing Recipe
4 Cups Powdered Sugar
1/2 cup Water (you might not use all of it)
1 tsp Lemon Juice
3 Tbsp Meringue Powder
Sift the powdered sugar into a large mixing bowl.
In a small bowl, combine lemon juice with water and set aside.
Mix 3 tablespoons of meringue powder into the sifted powdered sugar.
Begin by adding 3 tablespoons of the lemon water mixture to the powdered sugar mixture, mixing on low speed.
Continue adding more lemon water, one tablespoon at a time, until the icing begins to come together.
Add vanilla extract for flavor. Use clear vanilla if you want the icing to remain white.
For detailed piping, use as is for a stiff consistency. For flood consistency or dipping, gradually add more lemon water or plain water until the icing is smooth and pourable yet holds its shape.
Continue to mix on the lowest setting just until all ingredients are combined. Avoid overmixing to prevent the icing from becoming too airy or separating.
Royal Glaze Recipe
If you don’t have meringue powder or don’t want to use egg whites, royal glaze is a very simple recipe to go with! Working with royal glaze is easier and the finish is different from royal icing as it dries shiny and not matte. For reference, these cookies are covered with royal glaze.
1 1/2 Cups Powdered Sugar
3 tsp Corn Syrup
6-8 tsp Water
(Optional) Extract of your choice
Combine the powdered sugar, corn syrup, water, and extract (if using) in a bowl.
Mix thoroughly for a few minutes until the icing is smooth and fully incorporated.
Cover the bowl with a wet towel and let the icing rest for a few minutes. This helps to eliminate air bubbles.
After resting, check the surface of the icing for bubbles. Use a toothpick to pop any bubbles for a smooth finish.
How to make Valentine Cookies with a Marbled Effect:
Prepare Your Icing to the Right Consistency
Begin by preparing a flood consistency royal icing. This means the icing should be fluid enough to "flood" the surface of your cookies without running off the edges. Separate your icing into 3 bowls, making sure one f the bowls has at least 3 times more quantity than the 2 others.
Coloring the Icing
In the two separate smaller bowls, add gel food coloring to achieve your desired shades. For a classic marbled look, stick with just two colors besides white; adding more can make the design too busy. When adding the color, stir slowly and gently to avoid overmixing, which can cause the icing to dry powdery and dull. Then transfer the colored icing to a piping bag.
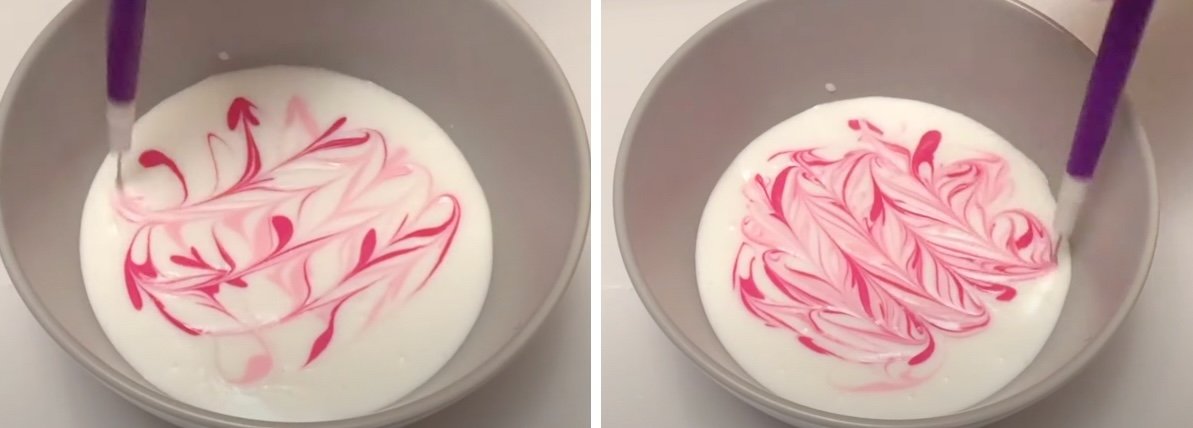
Squeeze dots of your colored icing onto the surface of the white icing in the large bowl. There’s no set pattern to follow; randomness can lead to more unique marbled designs.
Swirling the Icing
Using a toothpick or a trusting needle, gently drag through the icing dots to create beautiful swirls.
Dipping the Cookies
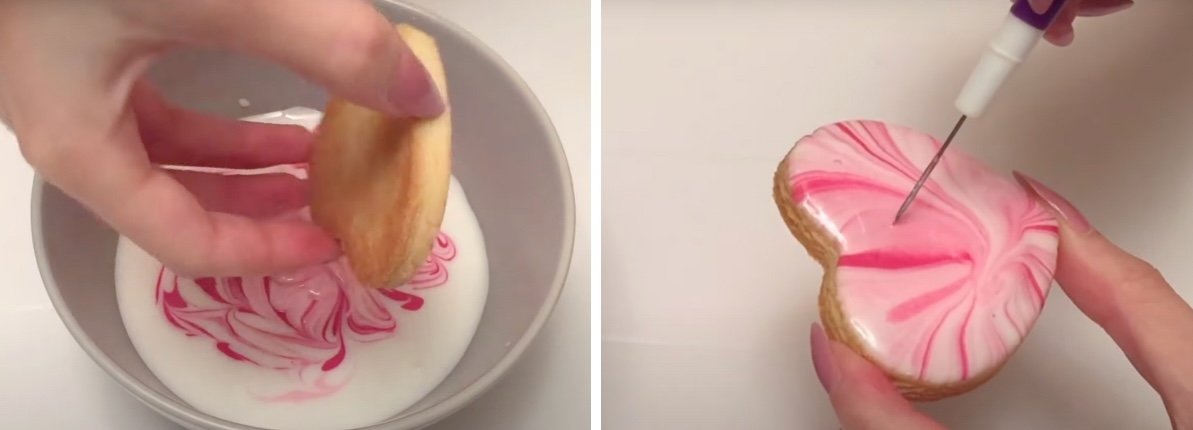
Gently dip the surface of each cookie into the marbled icing. Be careful not to submerge the cookie, just let the surface touch the icing. Lift and gently tap the cookie on the side of the bowl to make sure the icing covers the top evenly.
After dipping, hold the cookie over the bowl and give it a gentle shake to let any excess icing drip off. Avoid wiping the edges, which can smudge the beautiful marbled effect.
Setting the Icing
Once the dripping stops, flip the cookie right-side up and give it another quick shake. If you notice any air bubbles on the surface, pop them gently with your toothpick or needle.
Allowing the Icing to Set
Place the cookie on a baking rack or parchment paper and leave it to set completely, ideally for at least 24 hours. This ensures the icing hardens with a smooth, glossy finish.
Best Practices for Letting the Icing Set and Storing the Cookies
Allow the icing to set completely by leaving the decorated cookies in a cool, dry place for at least 24 hours. This ensures the icing hardens properly and the decorations stay intact.
Once the icing is set, store the cookies in an airtight container. Place them in single layers separated by parchment paper to prevent them from sticking together or damaging the icing.
Avoid storing iced cookies in the refrigerator as the moisture can soften the icing and affect its appearance.


