Learn the easiest way to get sharp buttercream edges on a layered cake covered in buttercream using just a regular knife. No fancy tools, no stress.

Published: April 5, 2025 by Pamela
This post may contain affiliate links. Please read our disclosure policy.
When you start making layered cakes and covering them with buttercream, you suddenly become obsessed with a few things; like how to get super white buttercream, what’s the best recipe out there, how to smooth it out just right, and of course… how to get those perfectly sharp edges.
Sharp edges can be tricky. You try one method, then another, and before you know it, you’re frustrated and ready to give up. I’ve been there too, back and forth, trying every tip out there. Until I found this one simple method that actually worked, I mean the other methods work too but in my opinion they take a lot of time and patience. The best part about this one? You only need a sharp knife. That’s it.
But before you get started, remember this, getting those edges clean starts with good buttercream. The texture matters more than you think, I talk about this in several articles. But you don’t need to go through them, the trick for smooth buttercream is working with room temperature butter and whenever you’re done with the recipe, set you mixer on the lowest setting for a good 10 minutes. That will eliminate all the air bubbles that will make covering a cake a pain.
Some buttercream recipes you might like:

Tools you need to achieve sharp edges on buttercream:
- A Sharp Knife (Yes, that’s it!)
Instructions for sharp edges on buttercream:
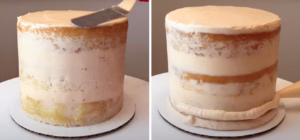
- Start by covering your layered cake with buttercream. I like to do a crumb coat first, chill it for about 15 minutes, then go in with the final coat. When applying the crumb coat, make sure the top is fully covered.
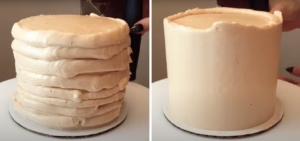
- You can apply the second coat however you prefer, I usually go with a spatula or a piping bag.

- Once your second coat is on, smooth it out using a cake scraper. Keep the scraper at a 90° angle the whole time. When the sides look nice and smooth, do one full turn with the scraper to clean up any seams. You’ll notice a little extra buttercream sticking out over the top edge, don’t worry about that.
- Place the cake in the fridge for at least 15 minutes, or longer if needed. The buttercream should feel firm to the touch before moving on.

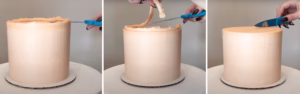
- Now for the fun part. Soak a sharp knife in hot water for a few minutes, then dry it off with a paper towel or towel.

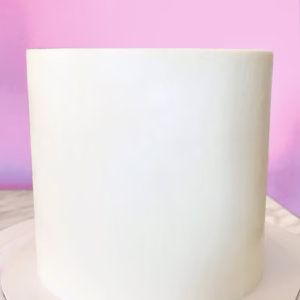
- To get those sharp edges, carefully trim the excess buttercream around the top rim. Go slow and try to keep your knife as straight as possible. Gently remove the extra buttercream, and you’ll be left with crisp, clean edges. You can go back and tidy them up a bit more if needed.

Frequently Asked Questions:
- What kind of buttercream works best? A smooth, stable buttercream like American or Swiss meringue works great. The texture should be firm but not rock-hard when chilled.
- Can I do this without chilling the cake? It’s not recommended. Chilling helps the buttercream hold its shape so you can trim it cleanly without smudging or dragging. If you don’t have time to chill the cake, consider using other methods.
- What if my buttercream tears when I cut? That usually means it’s too soft. Let the cake chill longer until the frosting feels firm to the touch before trimming.
- My knife keeps dragging the buttercream! Make sure your knife is hot and dry. Reheat and wipe it off between cuts for the cleanest finish.
- Does this work on whipped cream or ganache too? This method is best for buttercream. Ganache might work if it’s firm, but whipped cream is too soft and doesn’t hold edges well.
- Can I fix the edges if I mess up? Totally. Add a little more buttercream, smooth it out, chill again, and trim. It’s all fixable!

If you tried this method, be sure to leave a rating and share your thoughts in the comments below. I’d love to hear your feedback!
How To Achieve Sharp Buttercream Edges
Equipment
- 1 Knife
- 1 Cake
- Buttercream
- Hot Water
Instructions
- Begin by frosting your cake like you normally would. I always go in with a crumb coat first, chill it for about 15 minutes, then move on to the final layer. When doing the crumb coat, make sure the top is completely covered. You can spread on the second layer however you like, I usually grab a spatula or use a piping bag to make it quicker.
- Once that final layer is on, use a cake scraper to even out the sides. Hold the scraper upright at a 90° angle and work your way around. After it looks neat, do one full sweep to erase any visible lines. You’ll probably notice a little buildup of buttercream above the edge, leave it for now. Pop the cake in the fridge and let it chill until the frosting feels nice and firm, around 15 minutes or more depending on your fridge.
- Now that the buttercream is set, grab a regular kitchen knife and dip it in hot water for a couple of minutes. Dry it well with a towel before using.

- Carefully slice off the extra buttercream around the top, moving slowly and keeping the knife as level as possible. Once you’ve trimmed all the way around, gently lift off the extra bits. You’ll be left with clean, sharp corners. You can clean it more if needed.

Leave a Reply