New to cakesicles? Learn 10 easy tips to get smooth coatings, perfect texture, and pro-looking results with this beginner-friendly guide.
Published: July 1, 2025 by Pamela.
This post may contain affiliate links. Please read our disclosure policy.
I’ve been into cakesicles for a few years now, and if you’ve seen my Instagram, you know what I mean. I love a good baking challenge, and cakesicles are just that. I’m not really a fan of cake pops (where’s the space to decorate?), but cakesicles? That’s where I have fun.
I made the video of this article a while ago, but now it’s time to put it all into words and elaborate even more, that’s what I love about writing articles, I can tell you everything you need to know. In this article, I will explain 10 simple tips to master cakesicles as a beginner, and all the things I’ve learned from making cakesicles over and over again.
These tips work for any cakesicle, simple or fancy. If you follow them, I guarantee you’ll get a perfect base every time.
🧁 What Are Cakesicles, Exactly?
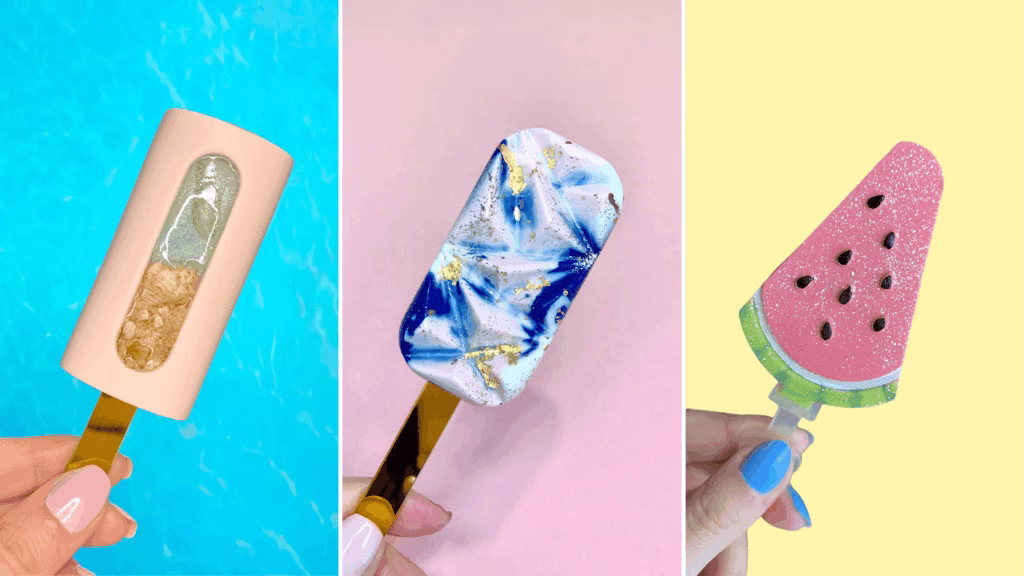
Before we start, what are even cakesicles? Cakesicles are a cake and a popsicle’s baby. It has the form of a popsicle but is filled with cake. You take crumbled cake and mix it with just enough frosting to create a soft, moldable dough. Then you press that mixture into a popsicle-shaped silicone mold that’s already coated with melted chocolate. Once it all sets, you’ve got a cake-filled chocolate shell that looks like a popsicle. They’re fun, beautiful, and totally customizable.
Cakesicles are perfect for beginners because they’re super forgiving. You don’t need to bake a cake from scratch, leftover cake or a box mix works perfectly. They’re easier to decorate than cake pops (no dipping disasters!), and the molds help everything hold together nicely. Also, they are super cute as gifts or as party treats!
Tools you need to make cakesicles:
Let’s share what really matters. If you know me, you know I don’t like having a bunch of extra stuff, I like to keep things simple. So if a tool isn’t truly necessary, I’ll give you a substitute you probably already have at home. No overbuying, no clutter. Just what you need to get it done.
That being said, here are the tools you need to start with cakesicles:
- Silicone Popsicle Mold: This is the main tool you’ll need. It gives your cakesicles their classic shape and makes it easy to remove them once they’re set. I got most of my molds from www.nycake.com (you can use my code Butter10 for 10% off your order, no it is not an affiliation).
- Popsicle Sticks: A lot of popsicle molds come with 50 or a 100 wooden sticks. You can also find some really cute sticks at www.nycake.com as well!
- Small Spoon or Brush: I like to use a paint brush, I find it way easier to control. A spoon works just fine, you can also just fill your mold, move it around to cover the sides, and then flip it over to remove any excess chocolate.
- Spatula (optional): Used to smooth out the back of the cakesicle and remove any excess, a knife works just fine.
That’s it, these are all the tools you need to make the base. Decorations might require more tools of course, but that is totally up to you!
🍫 What Chocolate Should You Use for Cakesicles?
You’ve got two main options: real chocolate or candy melts.
If you’re using real chocolate (like dark, milk, or white), you’ll need to temper it. I don’t want to make this article super long for you, so if you decide to use real chocolate, please learn all about tempering in my other article “How to Temper Chocolate the Easy Way”.
Candy melts, on the other hand, are beginner-friendly. No tempering needed. Just melt, pour, and go. The flavor isn’t as rich as real chocolate, but they’re easy to work with and come in tons of fun colors. It’s what I would go with.
10 Easy Tips to Make Perfect Cakesicles Every Time:
1. Work with a Clean Mold:
Before you do anything, make sure your silicone mold is super clean. These molds love to attract dust, lint, and random crumbs; and trust me, all of that will show on your finished cakesicles.
I like to wipe mine with a bit of white vinegar or lemon juice before starting. It helps remove any hidden grease or dust and gives you a clean surface to work with. Let it dry completely, and you’re good to go!

2. Secure the Cakesicle’s Bottom:
Start by adding a layer of melted chocolate into the mold. This is your base coat. Use a spoon or brush to cover the sides fully, then gently tap or shake the mold so the extra chocolate pools at the bottom. That spot is actually the front of your cakesicle, the part everyone sees.
This step is super important, especially when you’re using white chocolate or a light-colored coating. If you don’t fully cover the surface, the cake or filling might peek through once it’s set and that’s not the look we’re going for. A good base coat keeps everything sealed and smooth.

3. Tap the Mold After the First Coat:
Once you’ve added the first coat of melted chocolate, gently tap the mold on your work surface. This helps release any trapped air bubbles hiding behind the chocolate. It might seem like a small step, but it makes a big difference.
This is especially important if you’re using a textured mold. Air bubbles that stay trapped can create little holes or dents on the surface of your cakesicle, which will show once you unmold it.

4. Insert the Stick Before the Chocolate Sets:
Right after you coat the mold and tap out the air bubbles, insert the stick. Don’t wait for the chocolate to set first. Sliding the stick in while the chocolate is still soft helps it hold in place and gives you a clean, secure fit.
If you wait too long, the chocolate might harden and crack when you try to add the stick.

5. Let the First Coat Set Before Adding the Second:
After applying the first coat of chocolate, let it set fully before adding the second layer. I usually pop the mold in the freezer for about 3 minutes max. That’s just enough time to firm it up.
Don’t leave it in too long. If the mold gets too cold, the second coat will start hardening while you’re still applying it. That makes it hard to spread and can leave uneven layers.
6. Double Coat the Sides:
Remember when we tapped the mold and let the extra chocolate settle at the bottom? Good, that means the bottom is well covered. Now it’s time to secure the sides.
Use a bit more melted chocolate and apply a second coat just around the edges. This helps reinforce the shell and prevents cracks when you remove the cakesicles later.

7. Add the Filling Carefully:
When you’re adding the cake filling into the mold, don’t fill it all the way to the top. Leave a little space so you have room to seal it with melted chocolate later.
If you overfill it, the chocolate layer on the back will either overflow or end up too thin, which can cause it to crack or break when you remove it.

8. Let It Fully Set Before Removing from the Mold:
Once your cakesicle is sealed, give it time to set completely before unmolding. I like to place the mold in the freezer for about 10 minutes max, just enough to help the chocolate firm up.
Don’t leave it in longer, though. If the chocolate gets too cold, it can freeze and then start to sweat when it comes back to room temperature. That can ruin the finish.
9. How to Demold Without Breaking:
To remove your cakesicle without cracking the shell, start by loosening the sides. Gently push the silicone mold outward to release the edges.
Once all the sides are free, press from the upper back of the mold and work your way down. When you get to the lower back (where the stick is), hold the stick firmly and push the cakesicle out slowly.

10. Clean Up the Edges:
If you notice any extra chocolate around the edges after unmolding, just trim it off. You can use a small sharp knife to gently scrape away the excess.

🍰 How to Make the Cakesicle Filling:
The filling is super simple. You can go the classic route and mix crumbled cake with a bit of buttercream or frosting until it feels like soft, moldable dough, kind of like playdough.
The ratio is about 3:1 cake to frosting by weight. This means for every 300g of cakes you need 100g of buttercream or frosting. Different cakes have different moisture levels, so add the frosting little by little until you are satisfied with the consistency.
But there’s another trick I love: mix the cake while it’s still warm. The natural moisture from the cake binds everything together, so you don’t need to add buttercream at all. Right after baking your cake, let it cool slightly so you burn your hands while removing the cake from the pan. Then place the warm cake in your mixer bowl and mix on low speed using the paddle attachment.
If you tried these tips, be sure to leave a rating and share your thoughts in the comments below. I’d love to hear your feedback!

Leave a Reply